An Adjustable Training-Equipment Clearance Checklist
Evidence ExplainerQuick picks
FDS1 Adjustable Dumbbell Set, 45 lbs, 5 in 1
★ Top pick Adjustable-weight set listing- Planning note: Copy the listing's base, pieces, and stored arrangement into the room note
- Change zone: Leave the selection and re-racking area separate from the bench
Core Fitness Adjustable Dumbbells
5–50 lb adjustable dumbbell pair- Listed size: 14.5 in L × 7.9 in W × 7.5 in H per dumbbell
- Change zone: Record the cradle and handle-clearance space as a separate measurement
PowerBlock Elite EXP Adjustable Dumbbells
Stage 1 adjustable dumbbell pair- Listing check: Match the exact stage and package before copying dimensions
- Return spot: Plan where the pair and its selector components will rest after use
Bowflex SelectTech 840 Adjustable Kettlebell
8–40 lb adjustable kettlebell- Listed size: 8.8 in L × 7 in W × 12.5 in H
- Change zone: Keep the dial and tray area out of the bench and doorway route
When adjustable weights fit beside a bench only in the product photo, the missing measurement is usually not the dumbbell itself. It is the space around it: where the tray sits, where a setting changes, where you pick it up, and where it lands again. Sketch those four spaces before comparing a listing, and a compact room becomes much easier to read.
This room-planning checklist starts with the dimensions and package details on the matching model page, then compares those fields with the floor you actually have.
Make one four-part room note
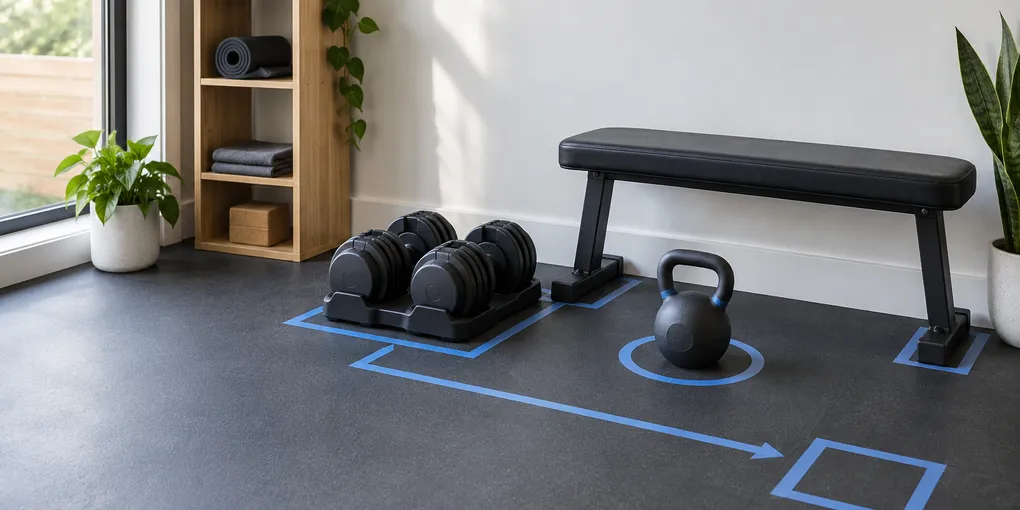
Tape is helpful because it turns a vague corner into a set of visible questions. You do not need to recreate every curve of the equipment. Mark the largest listed base or tray rectangle, then add the spaces that change while you use it.
| Part of the note | What to copy or measure | The decision it supports |
|---|---|---|
| Base or tray | The listing’s longest and widest stored arrangement | Whether the equipment has a home when it is not in hand |
| Adjustment zone | The space needed to reach a handle, dial, pin, or cradle | Whether changing a setting forces you into the bench or wall |
| Lifting path | The clear route from the return spot to the working area | Whether equipment must cross a doorway, desk chair, or other gear |
| Return spot | The place where every piece rests after use | Whether the floor can reset instead of becoming storage |
Leave the numbers in their own columns. A product’s length is not the room’s usable width, and a compact tray does not answer how much space you need beside it to make a selection. That separation keeps the four measurements from being treated as one.
Start with the base, then inspect the change step
The base is the stationary part of the plan. For a dumbbell pair, that may be two cradles or a larger stand. For a kettlebell, it may be the bell and its tray. Find the longest and widest dimension the exact listing provides, draw that rectangle, and label it with the model name.
Then step back and look at the adjustment itself. A twist handle, selector pin, or dial only matters to this checklist because it changes where hands and the equipment must be while you select a setting. Keep that zone clear of a bench leg, wall edge, and the route you use to enter the room. Do not borrow a measurement from a product that merely looks similar; package stages, cradles, and revisions can differ.
Core Home Fitness lists its adjustable dumbbell at 14.5 inches long, 7.9 inches wide, and 7.5 inches high per dumbbell, while noting that the dumbbell length changes as weight is added. That is a reason to write the model’s listed object dimensions down first, then inspect the separate area around its cradles before deciding where the pair returns.
Treat the bench route as its own line
The space beside a bench is often doing several jobs at once: it is a place to sit, a place to stand, a route past the bench, and sometimes the only clear patch of floor. A dumbbell pair can fit in that room without belonging in every one of those jobs.
Draw a simple line from the return spot to the place where you expect to use the equipment. Add the bench at its actual position, not pushed against a wall for the sketch. If the line crosses a doorway, a storage cabinet, or the spot where you normally turn around, move the return location on paper first. The goal is not to find an ideal universal layout; it is to make the unavoidable route visible before a new tray takes up the corner.
For adjustable kettlebells, keep the object dimensions and the surrounding route separate too. Bowflex lists the SelectTech 840 at 8.8 by 7 by 12.5 inches and names six weight settings from 8 to 40 pounds. Those fields help identify the listing you are comparing; they do not substitute for the clear area between the tray, bench, and return location.
Give the return spot a boundary
The reset after a session is where small equipment plans either hold together or disappear. A return spot can be a marked floor rectangle, a low shelf, or a stand that belongs to the exact model. What matters is that it answers two questions: can the equipment rest there, and can you reach it without moving unrelated gear?
Use the same order every time you compare an option:
- Copy the current listing’s model name, package or stage, and stated dimensions.
- Mark the base or tray rectangle where it would live.
- Add the adjustment zone beside it, rather than inside the bench footprint.
- Trace the pickup and return route with the bench, doorway, and nearby storage in place.
- Decide where the equipment will rest after use before treating the open workout area as available floor.
That last step makes a compact layout more honest. The floor may look open while you are holding a weight, but the room still needs a place for it when the session is over.
Current adjustable-weight listings to compare
Fresh Article evidence recorded these four direct Amazon listings as available at publication. Use the listing for the exact package and current seller details, then put those fields into the four-part note rather than assuming that all adjustable equipment uses the same base or change space.
FDS1 Adjustable Dumbbell Set, 45 lbs, 5 in 1
Core Fitness Adjustable Dumbbells
PowerBlock Elite EXP Adjustable Dumbbells
Bowflex SelectTech 840 Adjustable Kettlebell
Evidence boundary
Maker pages and current listing evidence can identify a model, package, and stated dimensions. They cannot measure your room, bench position, movement route, or return location. Make the room note from the exact listing you are considering, and recheck it before buying.
Frequently asked questions
What should I measure first for adjustable weights?
Start with the full base or tray arrangement, then add the area needed to change a setting and the place where the equipment returns afterward. Those are separate room checks.
Is listed equipment size the same as its workout space?
No. A listed length, width, and height describe the object. Your room note also needs the space where you pick it up, move it, and put it back.
Why plan a return spot before buying adjustable equipment?
A named return spot makes it easier to keep the equipment from occupying the bench, doorway, or walking route after a session. It also gives you one more dimension to compare with the listing.