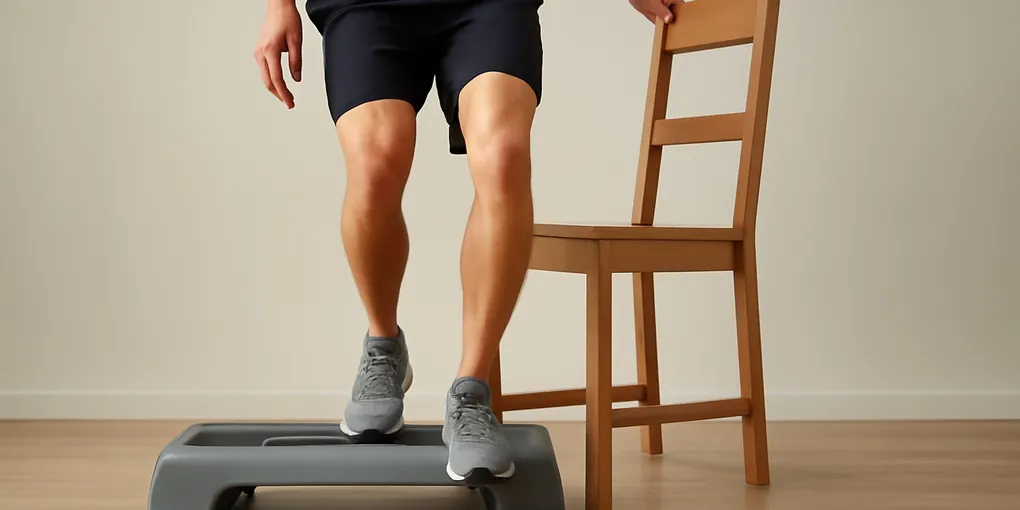
Lateral Step-Down Protocol: Knee Control Practice Without Chasing Depth Too Soon
ProtocolQuick picks
Adjustable aerobic step platform
★ Top pick Best controlled height- Best Use: Starting at a low height and adding risers only when control is clean
- Caveat: The platform must lock securely and not slide on the floor
Mini resistance band
Optional feedback tool- Best Use: Light hip-control feedback when the knee caves inward
- Caveat: A band is not required and can hide poor control if it is too strong
A lateral step-down is a simple test of control: stand sideways on a low step, lower the free heel toward the floor, and come back up without the stance knee diving inward. It looks easy until the hip, foot, and knee all have to cooperate. The drill is useful because it exposes sloppy single-leg mechanics before you add speed, jumping, or heavier lower-body work.
Start with a low, stable platform. If you need one, search Amazon for an adjustable aerobic step platform. A mini band can help some people feel hip position; search Amazon for light mini resistance bands only if you already understand the movement and want extra feedback. The step height still matters more than the accessory.
Quick setup
- Height: start at 2 to 4 inches, not a full gym box.
- Support: keep a wall, rack, or chair close enough for fingertip balance.
- Tempo: lower for two to three seconds, lightly tap the heel, then stand back up.
- Success marker: knee tracks over the middle toes without hip drop or foot collapse.
- Stop marker: sharp pain, swelling, giving-way, or symptoms that worsen after the session.
Quick picks
- Best platform: an adjustable aerobic step with locking risers, a grippy top, and a starting height you can keep below 4 inches.
- Optional feedback: a light mini resistance band only after bodyweight reps are understandable; skip heavy bands that force the knees outward and hide the real control problem.
- Best no-buy option: a stable bottom stair with a rail nearby, as long as the free foot can tap the floor without twisting.
Practical score
| Factor | Weight | Score | Rationale |
|---|---|---|---|
| Research | 30% | 6.5 | Step-down tasks are commonly used in rehab and screening contexts for lower-limb control, but exact home programming varies. |
| Evidence Quality | 25% | 6.0 | The movement is mechanically clear and easy to scale, though pain cases still need individualized assessment. |
| Value | 20% | 8.0 | A low step or adjustable platform is inexpensive and useful for many lower-body drills. |
| User Signals | 15% | 7.0 | Good sessions depend on stable equipment, tolerable height, and clear visual feedback. |
| Transparency | 10% | 8.0 | Height, surface grip, and load are visible and easy to adjust. |
| Composite | 100% | 6.9 | A high-value control drill when you keep the height humble and treat pain as information. |
Who this protocol fits
Use this if you can walk, climb normal stairs, and perform basic squats without sharp symptoms, but single-leg control feels messy. It fits runners, lifters, court-sport athletes, hikers, and people returning to lower-body training after a calm period.
Do not use it as your first self-treatment for a swollen, unstable, or recently injured knee. The AAOS knee conditioning program includes strengthening and flexibility work but also frames exercise selection around medical guidance after injury or surgery (https://orthoinfo.aaos.org/en/recovery/knee-conditioning-program/). If the knee gives way, locks, swells, or hurts sharply, get a clinician to guide the progression.
The 12-minute protocol
Step 1: baseline squat and stair check, 2 minutes
Do five slow bodyweight squats and climb a few normal stairs. If these already cause sharp pain or a clear limp, skip the step-down today. If they are calm, continue.
Step 2: low lateral step-down, 4 minutes
Stand sideways on the step with the working foot fully supported. Let the free leg hang off the side. Lower slowly until the free heel taps the floor, then stand back up. Use three sets of five reps per side. Keep the pelvis level and the working heel planted.
The first goal is not depth. The first goal is a quiet rep. If your hip drops, your foot rolls inward, or the knee dives across the big toe, reduce height.
Step 3: mirror or phone feedback, 2 minutes
Watch the stance knee from the front. The kneecap should generally track toward the second or third toe. Do not freeze the joint in place. Some forward knee travel is normal. The issue is uncontrolled inward collapse or painful depth.
If you film the rep, keep the camera still and compare left to right. You are looking for control differences, not social-media angles.
Step 4: add a light reach, 2 minutes
Once the plain rep is clean, reach the free heel slightly forward instead of straight down. This asks for more hip control and ankle dorsiflexion. Stay at the same step height.
Step 5: exit and reassess, 2 minutes
Walk for one minute and then repeat two easy squats. The knee should feel the same or better. If it feels irritated, record the height and rep count so the next session is easier.
How to progress
Progress one variable at a time. Add reps before height. Move from three sets of five to three sets of eight. Then add a small riser. Then add a slower lowering tempo. Do not add a dumbbell until the bodyweight version looks calm from both sides.
A mini band around the knees can be useful feedback if the knee collapses inward. Use light tension and think about steering the knee, not forcing it out. If the band makes the movement look better but the hip still drops, remove the band and lower the step.
For ankle-control work that is less knee-demanding, use the balance pad ankle stability protocol. For a strength-focused lower-body pattern, use step-downs as a warm-up before split squats or lighter single-leg hinges.
Common mistakes
The first mistake is starting too high. A six-inch step can be too much for a clean first session. A low book stack is not a safe platform because it can slide. Use a locked step, a sturdy stair, or a low box with a non-slip surface.
The second mistake is chasing a perfectly vertical shin. Knees bend. Ankles move. The goal is controlled load, not an artificial position that shifts everything into the hip or low back.
The third mistake is ignoring the next-day response. Mild muscle work is fine. Swelling, sharp joint pain, or a limp means the session was too aggressive or the drill is not appropriate right now.
Lateral Step-Down FAQ
How often should I do lateral step-downs?
Two or three times per week is enough for most home programs. Leave at least a day between sessions if the knee or hip feels worked.
Can I hold weights during the drill?
Only after bodyweight reps are clean at the target height. Add a light dumbbell or kettlebell in the opposite hand before using two heavy weights.
What if one side is much worse?
Train both sides, but let the weaker side set the height and rep target. If the difference is large, painful, or linked to injury history, get professional assessment.
Frequently Asked Questions
- Start with 2 to 4 inches or the lowest stable step you own. Increase height only after the knee tracks cleanly and symptoms stay calm.
- Some forward knee travel is normal. The bigger concern is painful depth, heel lift, or the knee collapsing inward without control.
- They can be useful for control practice, but sharp pain, swelling, giving-way, or post-session flare-ups need clinician-specific guidance.