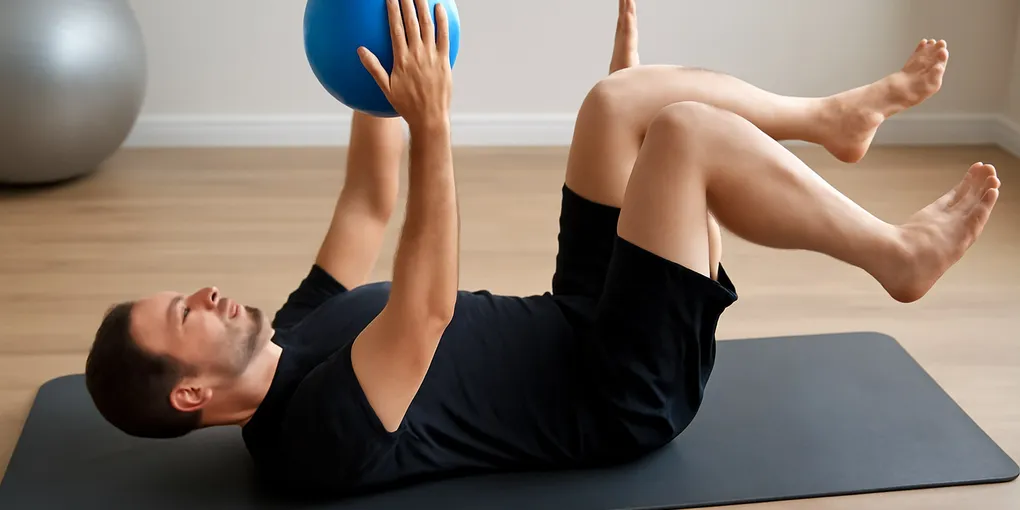
Dead Bug Core Control Protocol: Brace Without Turning Ab Training Into Back Extension
ProtocolQuick picks
Optional stability ball for dead bug progressions
★ Top pick- Best for: Pressing between hands and knees to teach bracing
- Key feature: Creates light tension without loading the spine
- Watch out: The floor version is enough for many beginners
The dead bug is not a flashy ab exercise. That is why it is useful. It teaches you to move arms and legs while your ribs, pelvis, and lower back stay under control. If every plank turns into shoulder fatigue or every rollout turns into back extension, dead bugs are the quieter starting point.
Use this protocol when you want a core drill that belongs before lifting, running, or harder anti-extension work. You need a mat and floor space. A small stability ball is optional, not required.
Who should use this protocol
Dead bugs fit beginners, lifters rebuilding bracing, runners who overarch during drills, and desk workers who need a low-load trunk-control exercise. They are also useful before harder tools such as ab wheels, sliders, or stability-ball stir-the-pot drills.
Skip or modify them if lying on your back is uncomfortable, if hip flexor cramping dominates every rep, or if you feel sharp back pain. This is a control drill, not a pain test.
Clinical exercise resources often describe trunk-stabilization training as a way to build control around the spine rather than chase maximal abdominal fatigue (https://www.ncbi.nlm.nih.gov/books/NBK557681/). The dead bug fits that role because the load is low and the feedback is immediate: if your back arches, the rep is too hard.
Practical score
| Factor | Weight | Score | Rationale |
|---|---|---|---|
| Research | 30% | 6.5 | Core-stabilization principles support controlled trunk exercises, though dead-bug-specific trials are limited. |
| Evidence Quality | 25% | 6.0 | The drill is biomechanically sensible and low risk when scaled. |
| Value | 20% | 9.0 | No equipment is required. |
| User Signals | 15% | 8.0 | People get clear feedback from rib flare, back arching, and breath holding. |
| Transparency | 10% | 8.0 | Progression is easy to define by range, tempo, and limb position. |
| Composite | 100% | 7.2 | A strong starter protocol for anti-extension control without buying gear. |
Step 1: find the starting position
Lie on your back with knees bent, feet on the floor, and arms pointing to the ceiling. Exhale gently until your front ribs drop. Do not smash your spine into the floor. Think of narrowing the space under your ribs while keeping your pelvis quiet.
Lift one leg at a time to tabletop. Knees stay over hips, shins roughly parallel to the floor. If that position already makes your back arch, keep one foot down and practice heel taps instead.
Take two slow breaths. If you cannot breathe without losing position, the drill is too hard. Breathing is part of the rep, not something you do after surviving it.
Step 2: heel taps
From tabletop, lower one heel to the floor without changing rib or pelvis position. Tap lightly, return, and switch sides. The moving leg should feel smooth, not like it is pulling your low back into an arch.
Start with 2 sets of 5 reps per side. Use a three-second lower, a one-second tap, and a controlled return. Stop the set when the back position changes.
This is enough for many people. If heel taps clean up your bracing before squats, deadlifts, or running drills, you do not need a harder variation that day.
Step 3: opposite arm and leg reach
Reach the right arm overhead while the left leg extends. Keep the reach shorter than your ego wants. Long levers are harder, so the first goal is control at a small range.
Exhale as the arm and leg move away. Inhale as they return. Switch sides. Do not rush the return, because the return often exposes whether you were bracing or just holding your breath.
Use 2 to 3 sets of 4 to 6 reps per side. If your hip flexors cramp, bend the knee more or return to heel taps.
Step 4: add a ball press
A small stability ball can teach tension. If you do not own one, search Amazon for a small stability ball for core drills and choose a size you can press without straining your shoulders. Place it between hands and knees, then press lightly while one arm and the opposite leg move away. The press should be gentle enough that your neck and jaw stay relaxed.
If you need a full-size ball for later progressions, search Amazon for full-size anti-burst stability balls and choose by diameter, grip, valve fit, and return policy. Buy for size and durability, not because the dead bug requires gear.
The ball press is useful before harder core tools. It gives you a simple reminder to keep ribs down while limbs move. It should not turn into a max-effort squeeze.
Programming
Use dead bugs in the warm-up or as a low-load accessory. Two or three sets are enough. Pair them with a hip hinge, squat pattern, or easy carry rather than stacking them after several fatiguing ab exercises.
Progress only when reps look boring. Add range before speed. Add reps before harder variations. Move to sliders or ab-wheel rollouts only when you can keep the same rib and pelvis control. Our exercise slider core protocol is a logical next step.
Stop signs and fixes
If your lower back arches, shorten the range or keep one foot down. If your neck strains, rest your head and reduce arm reach. If hip flexors cramp, bend the knee and move slower. If you cannot breathe, regress immediately.
Do not chase soreness. A dead bug should make your trunk feel organized, not wrecked. The win is better control during the next exercise.
Dead Bug FAQ
Are dead bugs better than crunches?
They train a different job. Crunches flex the trunk. Dead bugs teach you to resist extension while limbs move. Many people need the control piece first.
Can I do dead bugs every day?
You can practice low-volume dead bugs often if they stay easy and pain-free. Treat them like skill work, not a daily max ab finisher.
Why do I feel dead bugs in my hip flexors?
The hip flexors help hold the legs up. If they dominate, bend the knees more, reduce range, or keep one foot on the floor until your trunk control improves.
Frequently Asked Questions
- Dead bugs train trunk control, especially resisting low-back extension while arms and legs move.
- Keep ribs down and avoid arching. A small natural curve is fine if the pelvis does not tip and the back does not strain.
- Start with 2 or 3 sets of 4 to 6 slow reps per side and stop before your back arches.